How to Set Up a Trade Plan
The Trade Plan connects Signals to your broker accounts and/or prop firm/simulated accounts. The Plan also establishes trade management and risk/reward bracket orders.
Written By Zac White
Last updated 30 days ago
Creating a Trade Plan
Click the ‘+ New Trade Plan’ button, at top right. The ‘Create trade plan’ side panel will pop out.
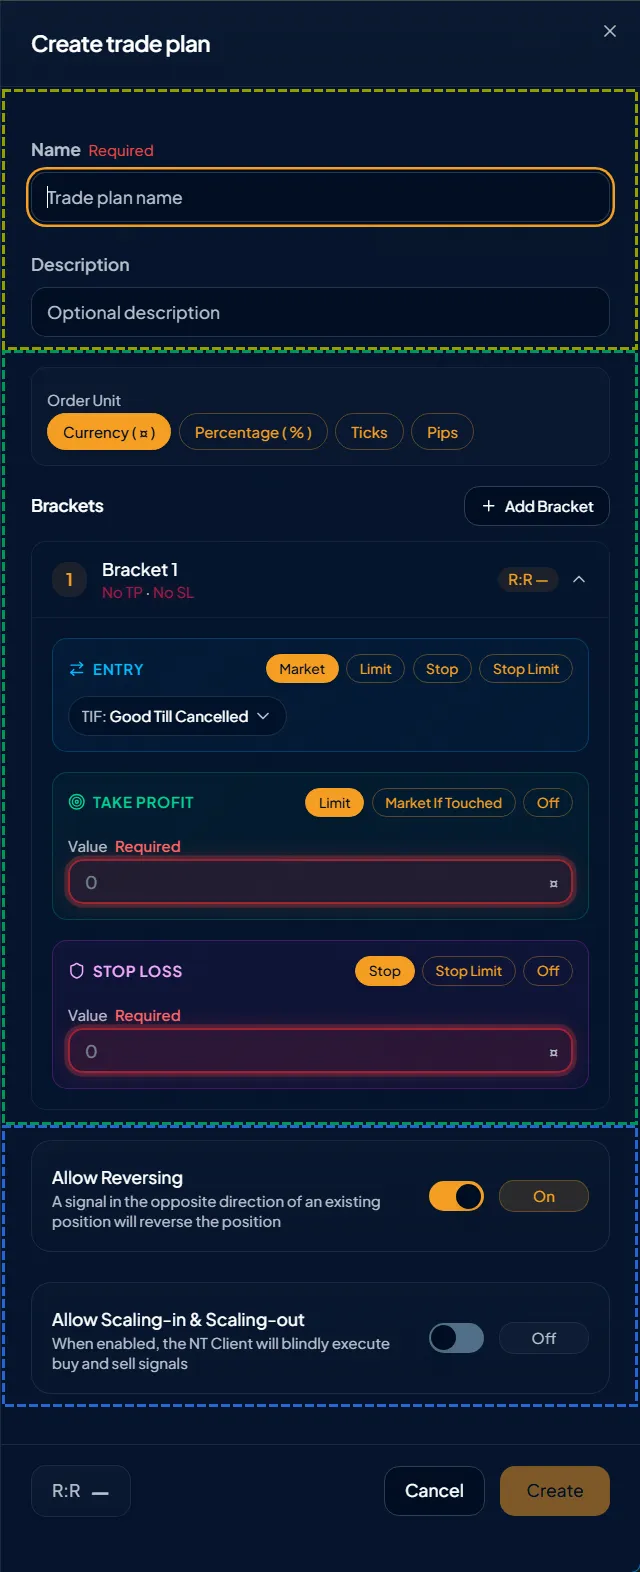
The panel consists of three sections.
Name and Description (yellow).
Entry order, and exit order brackets (green).
Signal and quantity positioning management (blue).
Name & Description
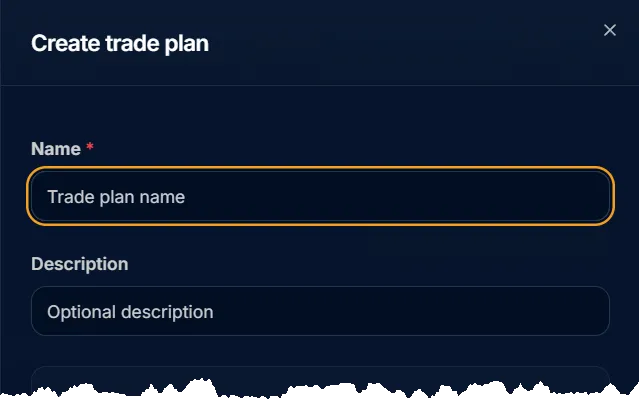
Fill in a Trade Plan Name, and provide an optional description.
Brackets
Specify the Order Unit and order Bracket(s).
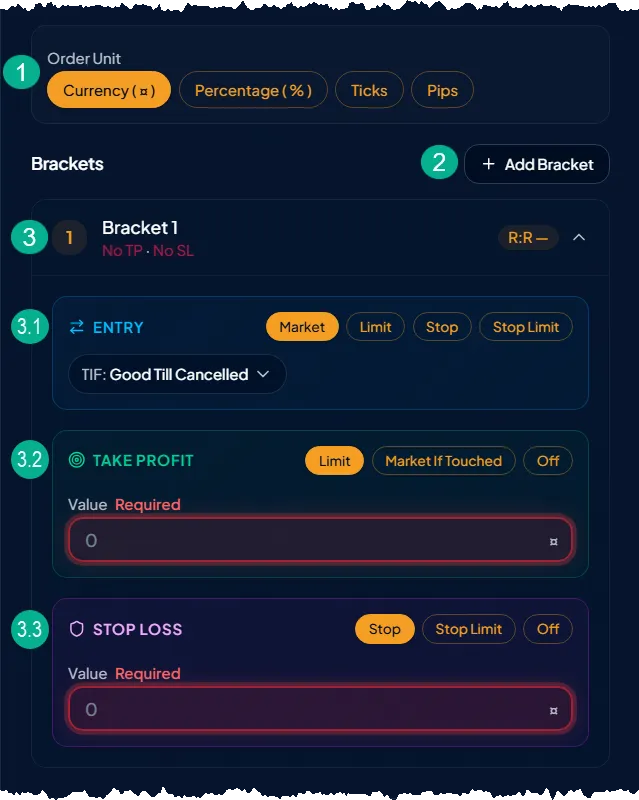
Order unit. Select the type of unit you want to use for specifying the order offset distance.
Currency (¤) specifies the offset distance in dollars, euros, British pounds, etc. The currency is determined by the symbol being traded. ¤ is the universal symbol for currency.
Percent (%) calculates the offset distance from the entry price.
e.g. If a buy order for AAPL is entered at $200, and the ‘Take profit’ is set to 10, the take profit order will be placed at $220. 10% of $200 is $20. $200 entry price plus $20 (10% take profit) equals a take profit of $220.Ticks specifies the offset distance in the symbol’s tick value.
Pips specifies the offset distance in forex pips.
Add Bracket button. You may add as many brackets as you want. Multiple Brackets are used for different scenarios. Some examples are to set different Take Profit levels when trading more than one contract/share, or to place cost averaging limit entry orders at different entry prices.
Bracket Entry, Take Profit, & Stop Loss order settings. Items highlighted in orange require a valid value to be entered.
Select the Entry order type.
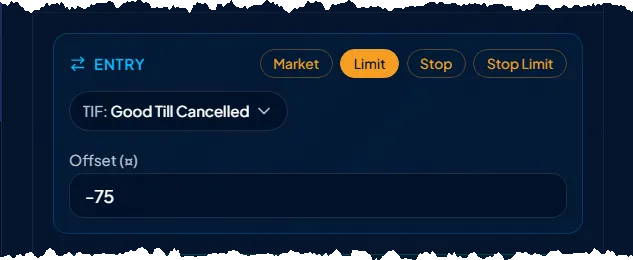
Offset amount for limit and stop entry orders. Positive or negative number? Think of this value for placing buy orders.
Limit entry order. The value should be entered as a negative number. Limit orders are placed below the market price for limit buy orders. Thus, this value is a negative, as seen in the image above.
Stop entry order. The value should be entered as a positive number. Stop orders are placed above the market price for stop buy orders. Thus, this value is a positive.
Select the Time in force (TIF) for the entry order. Available options are exchange supported types.
Take Profit. Select the order type. Then specify the offset distance (from entry).
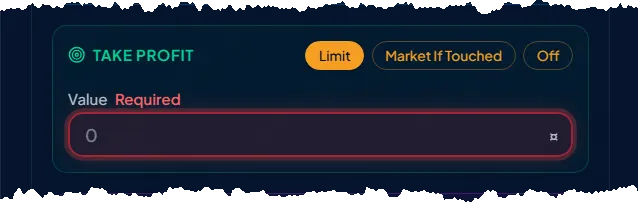
Order types.
Limit. Take profit orders are always a limit order.
Market If Touched (MIT). MIT orders are only supported by the NinjaTrader platforms. See NinjaTrader » Futures Order Types for more detailed information.
Off. Take Profit order is not placed. This is typically used with trailing stop-losses, or strategy signals where the strategy will send scale-out signals to close the trade.
Value. Specify the offset amount in accordance with the Order Unit. The value is always entered as a positive number.
Stop Loss. Select the stop order type (market or limit). Then specify the offset distance (from entry).
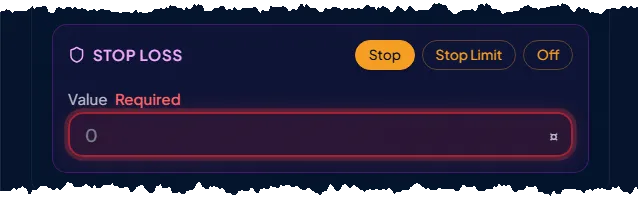
Order types.
Stop. (Stop Market)
Stop Limit.
Tip: Be mindful the market can jump over stop-limit orders in todays volatile markets, and thus may not get filled at the exchange.
Off. This option is not compatible with the NinjaTrader ATM. Trades executed on the NinjaTrader platforms are placed using the NinjaTrader » ATM (Advanced Trade Management). The ATM requires every bracket to have a stop-loss. If a Trade Plan » Bracket is lacking a stop-loss, the ATM will omit that bracket, and the associated contracts will not execute.
BlackBird and other non NinjaTrader accounts do not use the NinjaTrader ATM. Therefore, a stop-loss may be turned Off when using a BlackBird account node. For more info, see BlackBird vs. Other Account Nodes.
Value. Specify the offset amount in accordance with the Order Unit. The value is always entered as a positive number.
Bracket Quantity. The quantity field is only available when there are two or more brackets. Set the quantity for each bracket. Note, the total trade quantity is set by the Signal node in combination with the Account node » Overrides » Quantity. See Quantity Distribution below. The total quantity of all Brackets does not override the Signal quantity. This quantity determines the distribution amongst the Brackets.
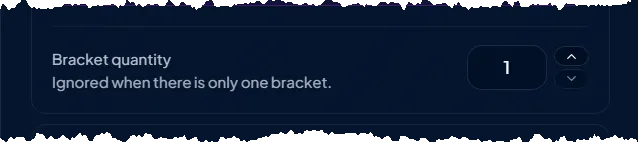
Quantity Distribution
When the quantity of the Signal exceeds the total quantity of all Brackets, the excess quantity is placed in Bracket 1.
e.g. If the signal quantity is 5,
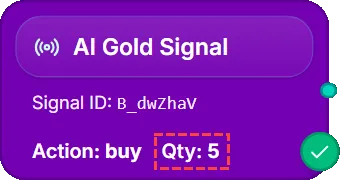
and the total Bracket quantity equals 2,
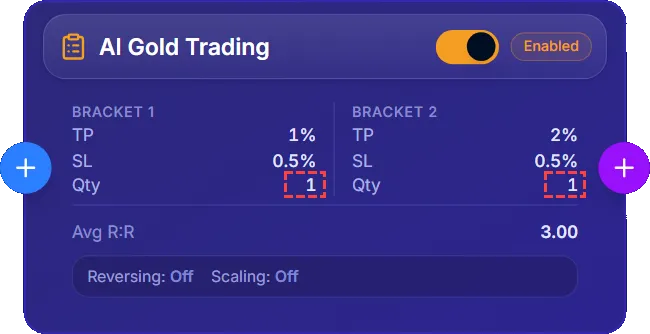
the extra 3 contracts will be placed in Bracket 1.
When the quantity of the Signal is less then the total Bracket quantity, the quantity of Bracket 1 is filled first. The remaining quantity goes to Bracket 2. The process repeats until no quantity remains.
Signal Management
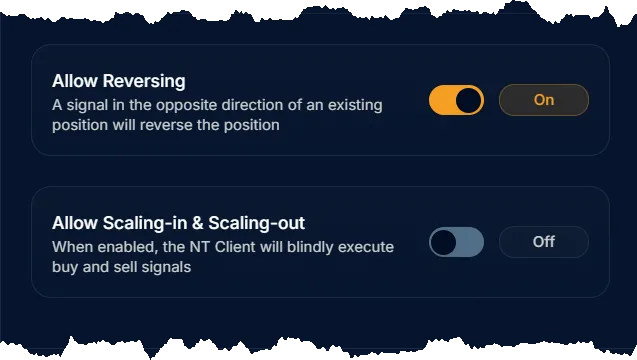
Allow Reversing. Turning On allows a signal in the opposite direction of an existing trade to be reversed. Otherwise, when Off, if a long trade position is active and a short signal occurs, the short signal is ignored (and vice versa).
Allow Scaling-in & Scaling-out. Turning On allows the position quantity to increase with each additional Signal that may occur during an active position. The position will be decreased to match the quantity of TradingView’s {{strategy.position_size}} placeholder for strategies.
Click the Create button when finished.
Connect Signals and Accounts
To complete a Trade Plan, a Signal and Account must be connected, via the visual trade plan node screen, to the Trade Plan.
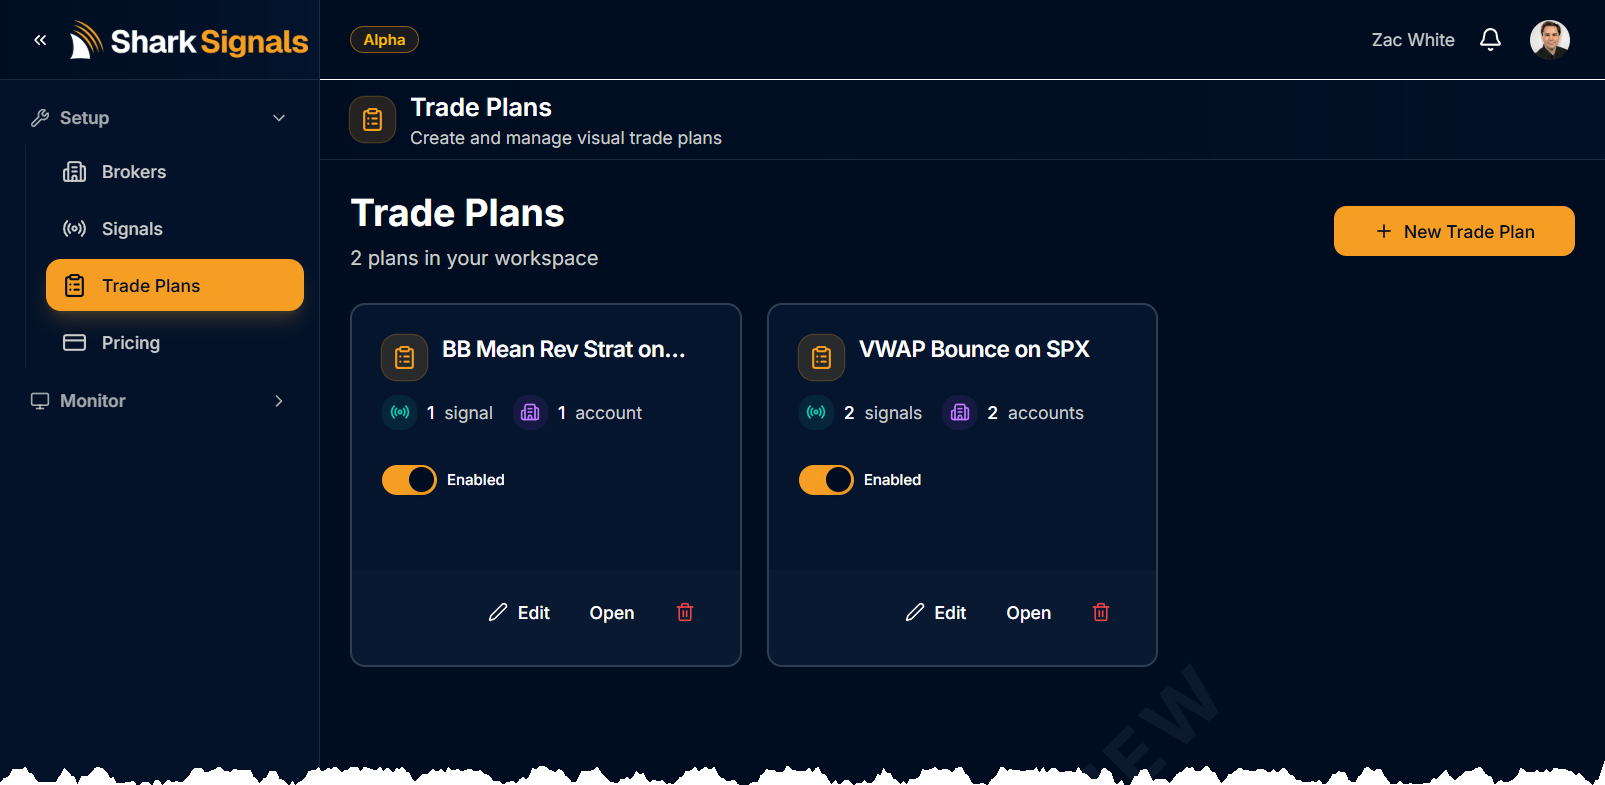
Click on a Trade Plan card to open the visual trade plan screen.
Add a Signal
Click the left side ⊕︀ button.
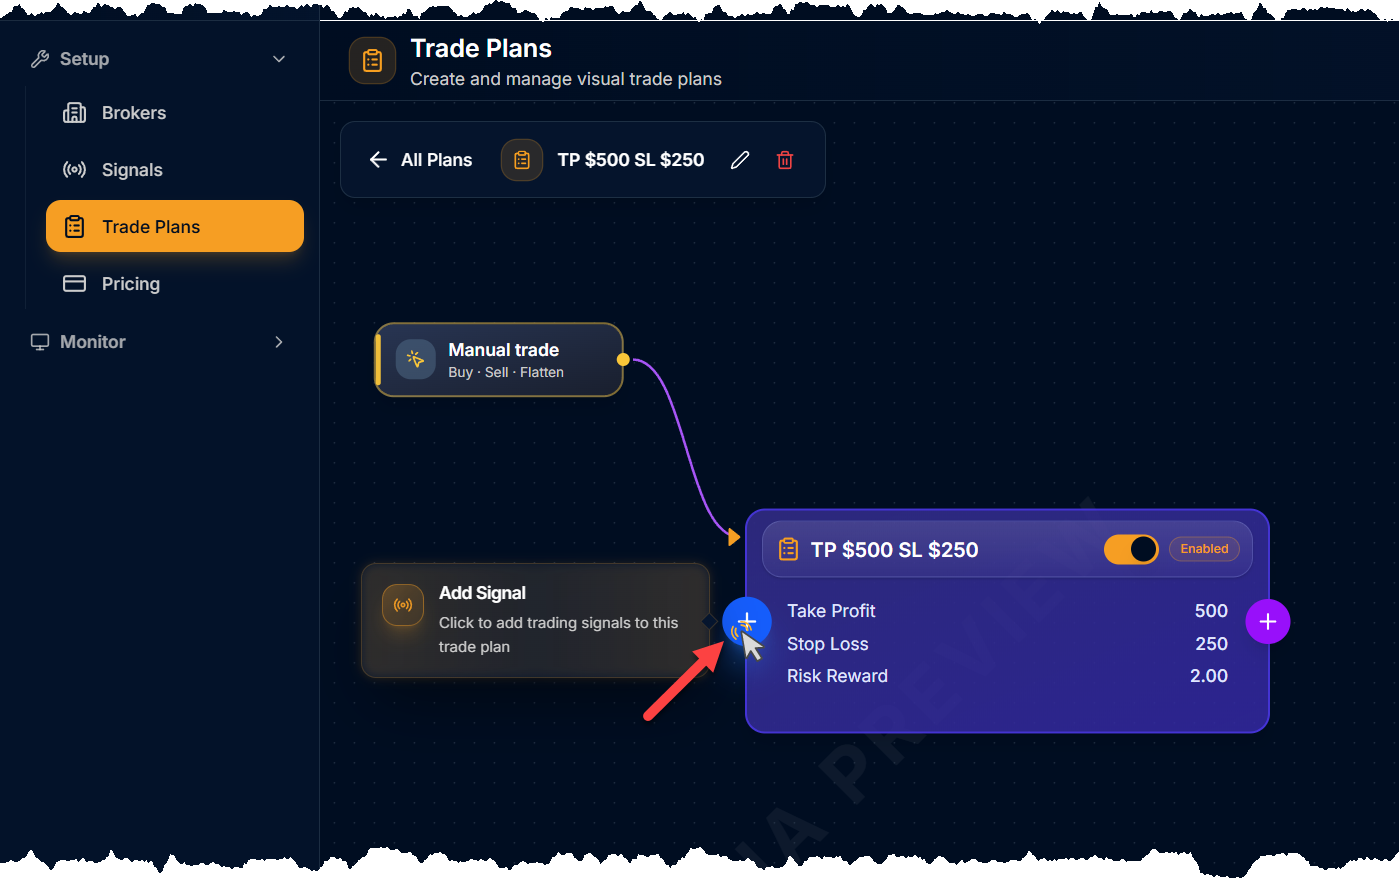
Select a Signal from the Add Signal menu.
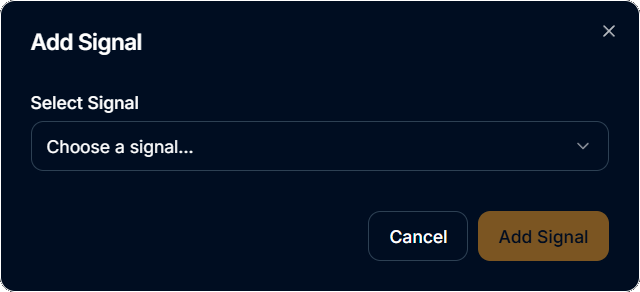
Set Up the Signal.
TradingView Signals. SharkSignals turns TradingView Alert messages into Signals. Alert message placeholders can be overridden by clicking on the Signal node. A settings panel will pop out.
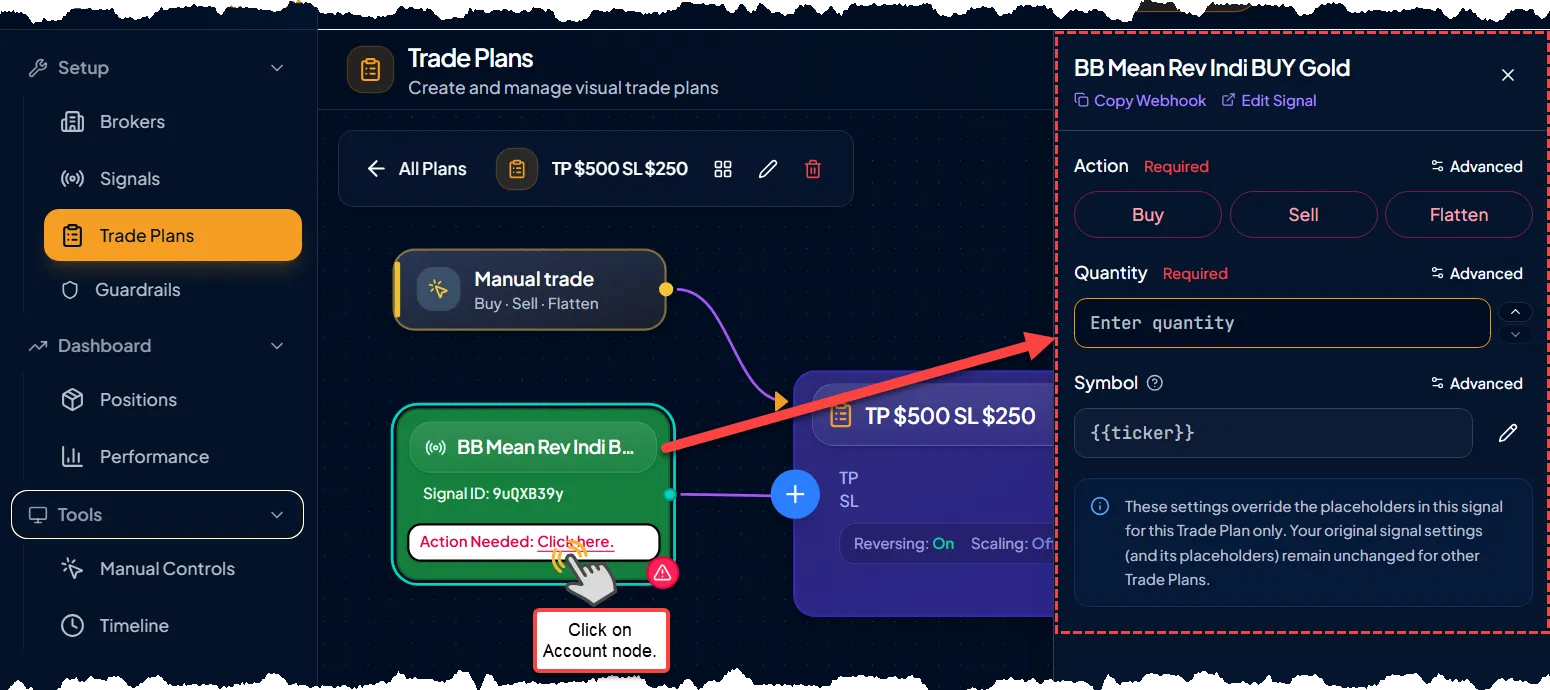
Signal Fields:Action. Possible actions are, Buy, Sell, or Flatten.
Quantity. The number of contracts or shares to trade.
Symbol. The symbol/instrument to trade.
Tip: SharkSignals will convert tradable TradingView futures symbols to NinjaTrader instruments.
Examples:
• ES or ES1! may be used to automatically specify the E-mini S&P500 front month contract.
• ES?## and “ES ##-##” can be used to specify the specific contract expiry.
• MGC or MGC1! may be used to automatically specify the Micro Gold front month contract.
• “MGC Mar ##”, “MGC ##-##”, can be used to specify the specific contract expiry.
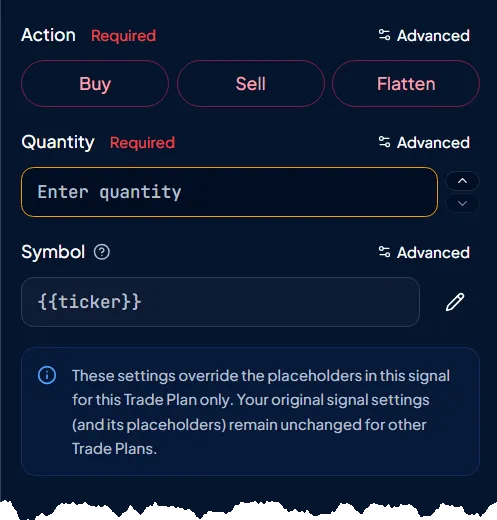
Signals from TradingView Indicator Alerts and TrendSpider Alerts. The Action and Quantity must be specified in the Trade Plan side panel for TradingView indicator based signals, because indicator Alerts do not have placeholders for these two fields.
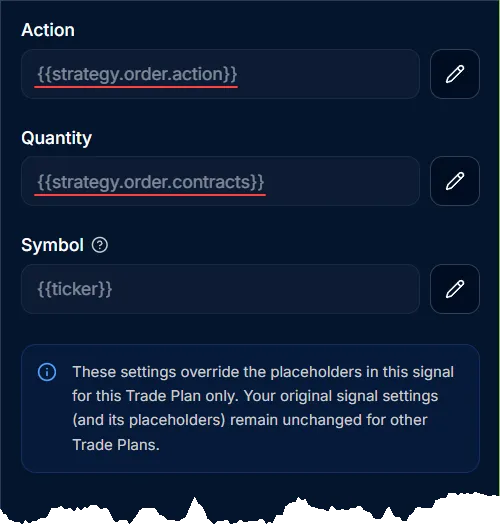
TradingView Strategy Signals. The Action and Quantity are typically left unchanged for TradingView strategy based signals, because the placeholders will transmit the information.
Add an Account
NinjaTrader Accounts: All accounts, except the BlackBird account, execute trades using a custom NinjaTrader » ATM that matches the Trade Plan » Bracket orders.
The BlackBird account can execute either an ATM or BlackBird » Order Sets. See below for more detailed information.
Add an Account by clicking the right side ⊕︀ button.
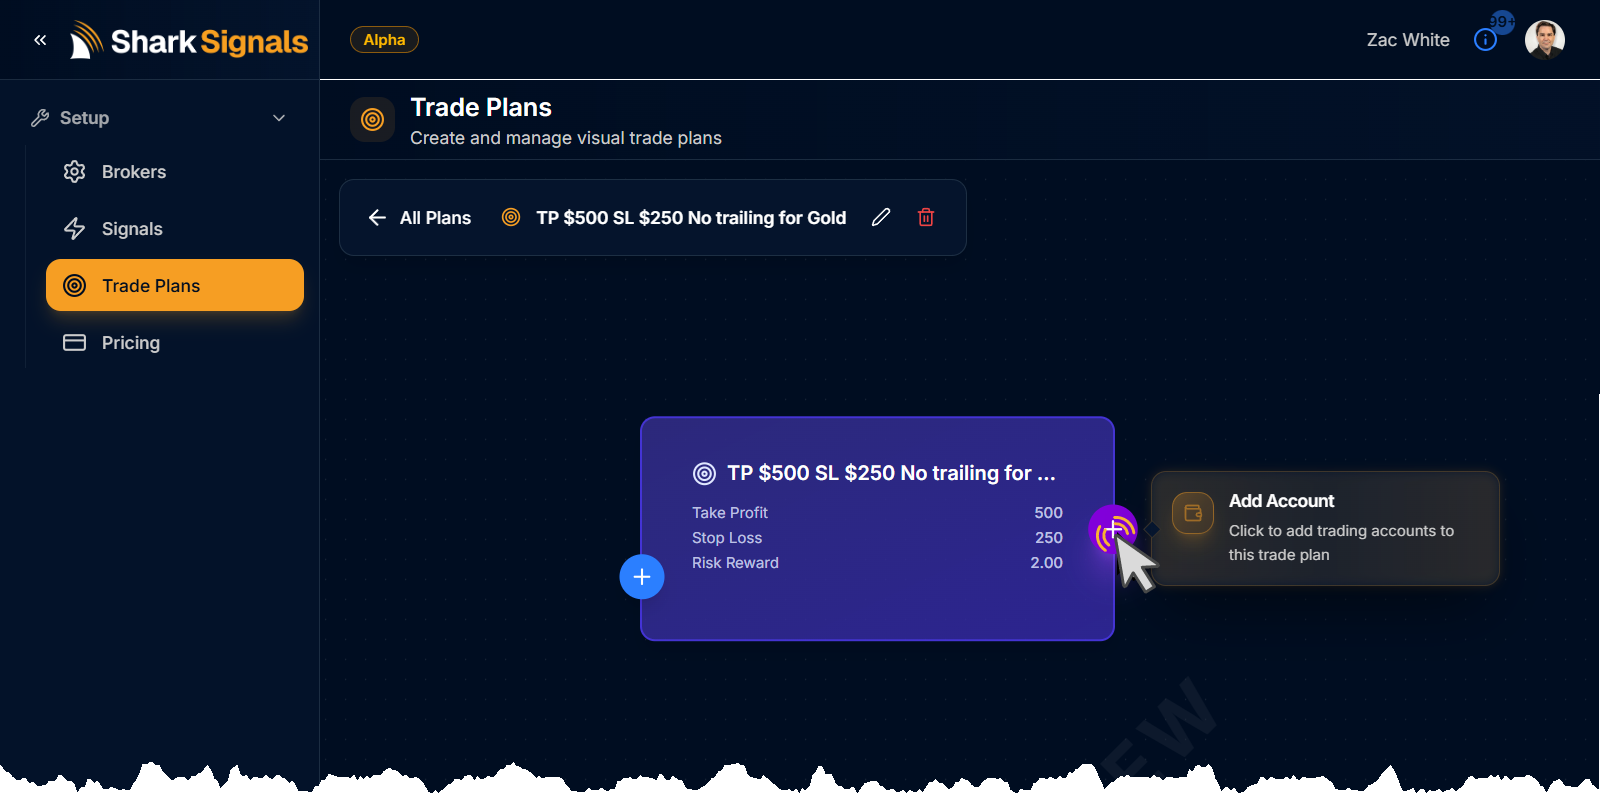
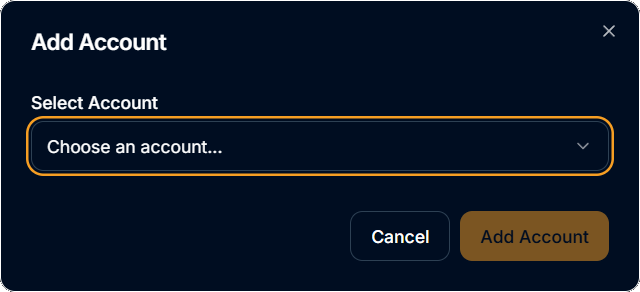
Select an Account from the Add Account menu.
Multi Account Parallel Trading
You may connect as many accounts as you want to a Trade Plan. Connecting multiple accounts is a more reliable way to “trade copy”, because parallel account trading is faster and does not rely on receiving an execution from the master account. All accounts connected to a Trade Plan node execute the Signal in parallel.
Account Options
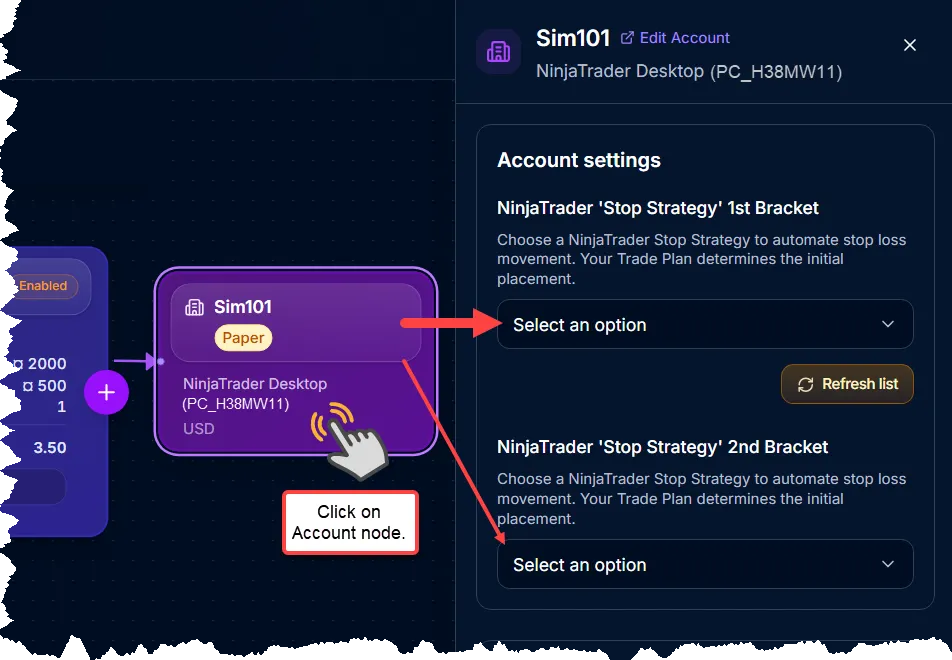
NinjaTrader ‘Stop Strategy’ option. When the account is from NinjaTrader, an option to use an ATM » Stop Strategy will appear. The stop-loss trailing will be managed by the selected Stop Strategy.
Overrides.
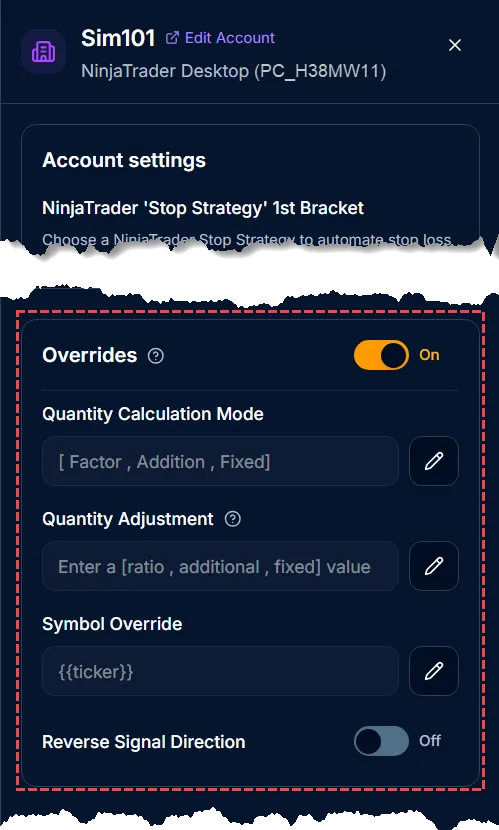
Quantity Calculation Mode.
Factor. Multiply the Signal quantity by the Overrides » Quantity Adjustment. i.e. The quantity in the Signal node is 3. The Overrides » Quantity Adjustment is 2. 3 × 2 = 6 (total quantity traded).
Addition. Add the Overrides » Quantity Adjustment value to the Signal quantity. i.e. The Overrides » Quantity Adjustment is 2. The quantity in the Signal node is 3. 2 + 3 = 5 (total quantity traded).
Fixed. The Signal quantity is ignored, and the Overrides » Quantity Adjustment is used instead. i.e. The quantity in the Signal node is 3. The Overrides » Quantity Adjustment is 2. 2 is the total quantity traded.
Quantity Adjustment. The value in this field modifies the Signal quantity to reach a total quantity traded.
Symbol Override. The traded symbol can be changed for this account node. The symbol is only changed for this Trade Plan » Account. This allows for smaller accounts to trade micro futures (e.g. /MES, /MCL, /MBT) when the Signal is set to trade the micro contracts (e.g. /ES, /CL, /BTC) for larger account.
This setting can also be used in hedging systems when the Reverse Signal Direction is enabled. e.g. Buying gold, and selling silver. Going long /CL, and short /NG.Reverse Signal Direction. This facilitates hedging systems. When two account nodes are connected to the Trade Plan, one account will trade in the direction of the Signal (Reverse Signal Direction is Off). While, the other account will trade in the opposite direction of the Signal (Reverse Signal Direction is On).
Finished. ✔
Your system is now complete. Alerts from TradingView, TrendSpider, etc. are ready to be traded on the NinjaTrader platform, and executed by your NinjaTrader broker.
Tip: Clicking on a node allows the settings to be edited at any time via the side panel.
Additional BlackBird Information
Using BlackBird with SharkSignals.
BlackBird vs. Other Account Nodes.
Manual Trade Node
A Manual Trade node exists for every Trade Plan. It facilitates issuing a trade signal to the Trade Plan and the connected account node(s).
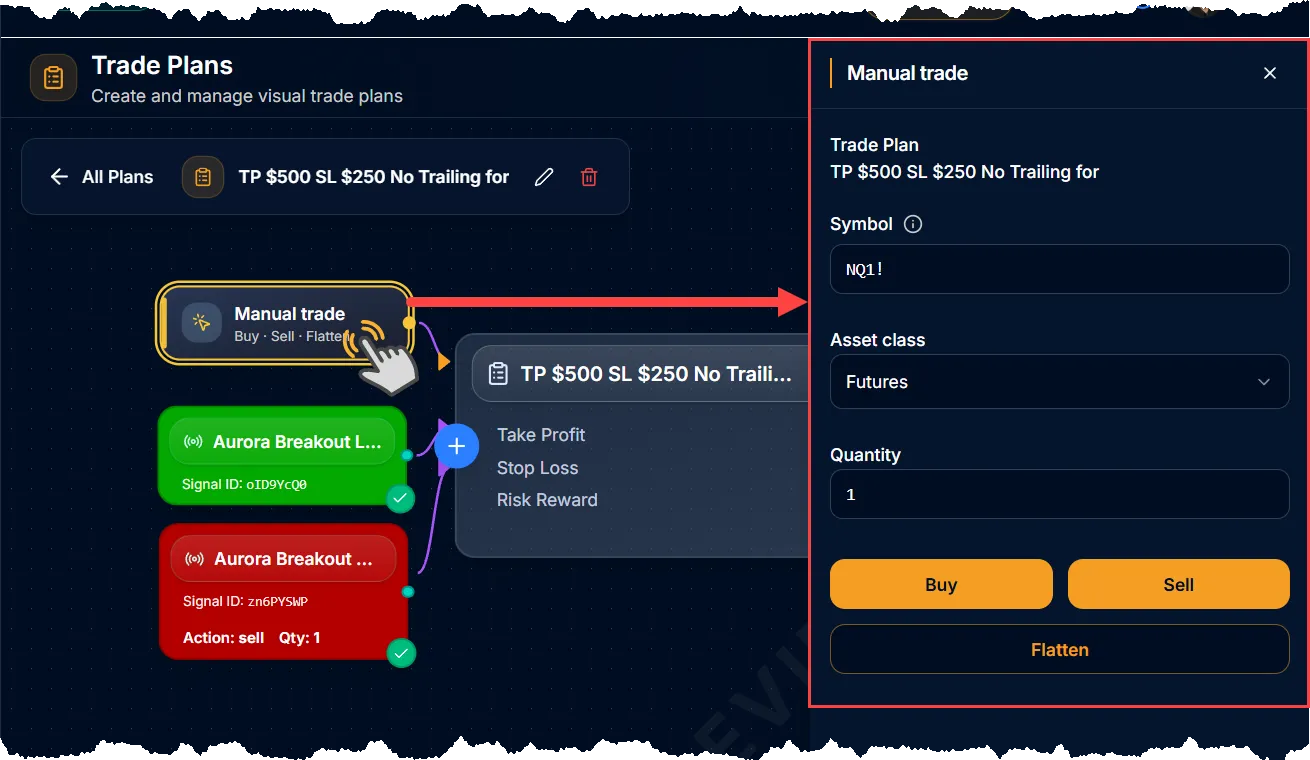
Setting up the Manual Trade node:
Click on the Manual Trade node to open the side panel.
Type a tradable instrument in to the Symbol field, and select the Asset class.
Specify a quantity.
Now the Buy, Sell, and Flatten buttons are ready for manual trading. The trade will be executed in accordance with the Trade Plan settings, and Account node overrides.
Other Articles of Interest
Was this helpful?
Still need help? Ask the team